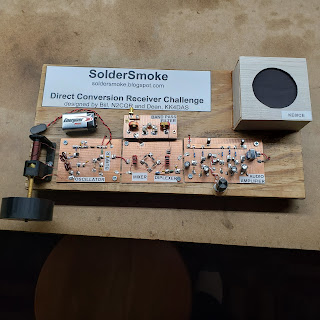
Erik built a really nice receiver. I was glad that he took to heart our advice on the need for a large, insulating tuning dial. He made one! As he made this entire receiver.
Eric wrote:
I would like to make a homebrew QSO! I am learning CW, mainly because I find it easy to use QRP/POTA. I have a Michigan Mighty Mite, but it has not reached farther than my backyard yet, so a CW transmitter in the single Watt range would be a great next project.
Congratulations Erik!
———————————
For more information on how you too can build the receiver:
Above you can watch and listen to Wayde’s receiver as he tunes across 40 meters. It sounds good, even though Wayde is thinking about some improvements.
It was highly appropriate that Wayde’s first reception report should be of CHU Canada, the Canadian time signal on 7.850 MHz, a bit above the 40 meter band, but clearly in tuning range for an unmodified SolderSmoke direct conversion receiver. CHU is probably unique in the world in that it is transmitting the carrier and JUST ONE SIDEBAND. It transmits only the upper sideband. This makes it clearly detectable by our receiver. As Dean pointed out to Wayde, all he had to do was “zero beat” the carrier with the PTO signal (tune to the point where they are on the same frequency and the audio tone disappears). Because there is only one sideband, the direct conversion receiver can demodulate it very well. If there had been two sidebands, this would have been a standard AM signal, and our little receiver — which does very well with SSB and CW — would have been unable to demodulate the signal without distortion. (For an explanation of why this is, see: https://soldersmoke.blogspot.com/2022/12/but-why-why-cant-i-listen-to-dsb-or-am.html Warning — this is kind of in the “advanced course” category.)
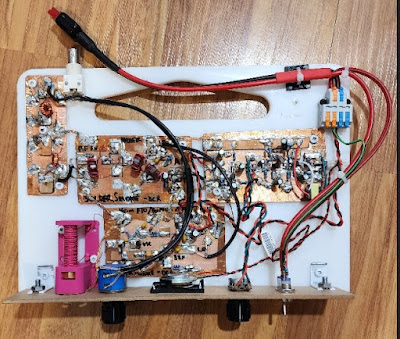
Here is an overhead shot of Wayde’s receiver:
This is a really nice build. The use of what appears to be a kitchen cutting board harkens back to the early days of radio when young hams took the cutting boards from their mothers’ kitchens and used them as bases for rigs. This is origin of the term “bread board.” Frank Jones continued in this tradition by building most of his rigs on wooden boards. Wade’s DC receiver continues in that tradition.
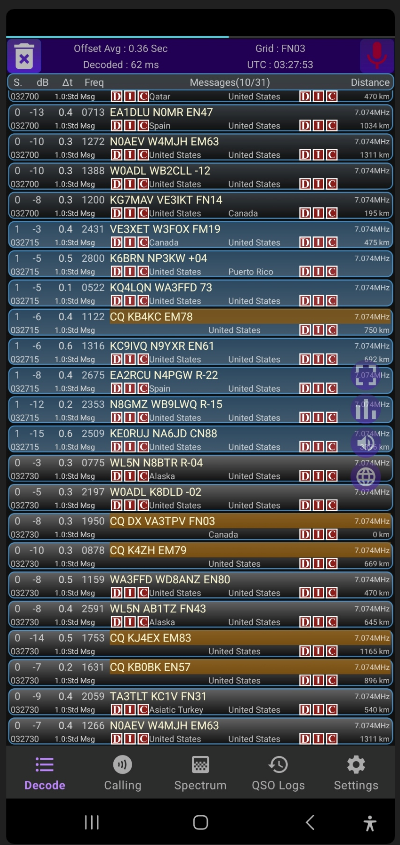
Wade was able to decode some FT8 picked up by this receiver and recorded on his phone:
Congratulations Wade!
—————————-
For more information on how you too can build the receiver:
Ken W4KAC tells me that the tuning knob that he used to minimize hand-capacitance effects on his PTO started out as a gear in a leaf blower. I commented that the engineers who designed that gear surely never thought that it would someday be used in a homebrew direct conversion receiver.
Ken lamented the polemical nature of the SSB discussion captured in the above video, but the clip does give a good demo of the SSB capabilities of Ken’s receiver. And the video gives some nice close-ups of the receiver itself.
Ken is a CW guy, and he has already homebrewed a QRP CW transmitter that he hope to pair-up with the receiver. Here it is:
Good morning. Just wanted to say, don’t give up if your receiver is not quite right. Mine was working, I even posted a video here. When building the AF amp from the transformer end back, the Q4 stage was fine. I added Q3 and had a “motor-boating” oscillation when I applied a signal. I tore it all off the board and started over. I still had the problem, so being stubborn I continued on and kept adding more filter caps to quiet it down all I could. The receiver worked and sounded pretty good during the day when I copied WA4FAT and others. That evening was a different story when the band was working well and very full of signals. Very strong stations were ok, but I was getting lots of “hash” and noise other than normal band noise. FT8 was breaking through weakly all over the band along with other unidentified stuff. Yesterday morning I grabbed a new piece of copper clad and built and entirely new AF amp. It tested properly all through the build. Instead of installing that board I decided to find the problem with the original. I “thought” I had used new transistors when I rebuilt it the first time. Turns out I had probably put the original Q3 back, because replacing it cured the problem. I had an entirely different receiver last night. A pleasure to listen to. Don’t give up like I did at first!!
Ken went the extra mile by building a SECOND Direct Conversion receiver. So he may soon get TWO Hall of Fame credits. Here is the second one that Ken built:
Jason did a great job on this receiver, hanging in there as he worked to overcome techincal difficulties, some of which were related to test gear. That is a big part of the homebrew process. The receiver looks and sounds great Jason. Congratulations.
Jason wrote:
I really like the camaraderie and elmering during the process. Not to mention seeing the different builds and how people approached the design. That helped me, as I’m a visual learner. I’ve been a ham for almost 40 years and I love building rigs. This was a blast.Thanks again, Jason WV3V
——————————————
For more information on how you too can build the receiver:
Herodotus once said that “learning is not child’s play — we cannot learn without pain.” I think Jim KF8BOG proved that in this build. I’m sure he burned his fingers at least a few times. I remember fondly almost seeing the light buld turn on when Jim came to understand how the diode ring mixer really works. He struggled to tame a rebellious AF amplifier (we’ve all been there). Throughout Jim demonstrated the persistance and determination that are needed to turn a bunch of parts into a well-functioning receiver. He did it. He built it. Congratulations OM!
Jim wrote:
I am not just an appliance operator now but only half way through. Time to make a transmitter!
A little about me I became interested in Ham radio about 45 years ago in Boy Scouts I tried really hard with my Radio shack straight key and morse code chart to learn code by myself and just could never get it. Fast forward to last year and I had a friend who did CERT and he told be about it and said he used 2 meter for communications I was impressed and said “how did you learn morse code?” he replied “ I didn’t you don’t need it anymore” I promptly signed up for Ham in a day in June and got my technician license and my then my general in August. I have been studying radio ever since. This project was perfect for me. I like to make things I have been a mechanic for 40 years plus ASE master. Fixed all sorts of crazy electrical issues but DC and RF are way different lol.
Again Thanks Bill and Dean you don’t know what you have started. 73s KF8BOG
———————————-
For more information on how you too can build the receiver:
In many ways it was for guys like John W8UC that we launched this project. These are guys who have been hams for a long time, but — like most hams — never built anything. Most guys don’t see this as a problem. But some guys just don’t like to think of themselves as “appliance operators.” For years the ARRL and others told hams that receivers were just too difficult for them to build. We found this not to be true. So we launched this project, first at a local high school, then to a larger group.
In his comments John says he has been an appliance operator for 48 years. Well, you are an appliance operator no more John — you have built a receiver.
John wrote:
I can hear the signals on a receiver I built so I am super happy about that… I have learned more in the last month about how a receiver works than I have in the last 48 years of being an appliance operator. Thank you Dean and Bill. 3. Would like to build a transmitter next. Also a receiver for another band.
———————
For more information on how you too can build the receiver:
Dean and I often say that we too have learned a lot from this project, and that the receiver has gotten better as a result of all these builds. But in KE2AMP’s case we really see an innovation that nobody has used before. But it is a great idea and it solves the “loose screw” problem of the PTO. Check out the spring on John’s PTO. That is really smart. Thanks John.
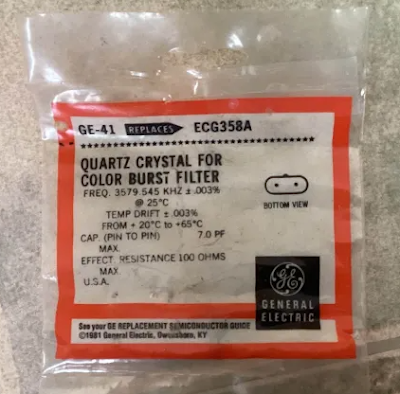
John also sent me a crystal wrapper that will long be cherished by the CBLA (Color Burst Liberation Army):
John wrote:
Well I completed my DCR, and am receiving signals on 40 meter at 1900UTC. My audio amp will oscillate if I turn up over half way and my pto is little loose and makes it bit hard to tune. I put a light spring behind the pto bolt to give it some friction and tighten up. I’m thrilled that I’m receiving signals. I still want to add a front panel to mount the volume pot, the on/off switch and speaker if I have the room.
I am so Thankful to Bill, Dean and everyone on the discord for this project I learned so much more being able to ask questions and follow along with other builders as we worked through each stage of the build. I definitely learned some things about oscilliscopes. And testing each of the stages as we went along.
I would like to try my hand at a SSB transmitter to go along with this receiver. I have built a working MMM but was just to see if I could. I don’t know CW
Oh and I included pic’s of something Bill will like.
Pick it up at a ham fest last summer.
Will that get me into the color burst liberation army?
Thanks Again, 73
de John KE2AMP
Consider yourself inducted John. The CBLA needs innovative people like you!
————————-
For more information on how you too can build the receiver:
It was really great to hear those Australian voices coming from Phil’s receiver. Check out the video above.
Phil writes:
Completion! So pleased, it works really well. And there were lots of lessons for me along the the way. Thank you Dean, Bill and Pete, it’s been a great way to get me into homebrewing. 73s from sunny Queensland. Phil VK4PG
I also like Phil’s front panel. Note how he put to use the circular piece that remained after cutting the speaker hole; that became the tuning knob. FB Phil. Thanks.
For more information on how you too can build the receiver:
Derek N9TD was another of the early builders of the Direct Conversion receiver; he has done really magnificent work. He is an Electrical Engineer, and you can see in his work (and in the email below) the tension that exists between the desire for simplicity and the urge to improve. In the above photo, for example, we see that Derek had already gone ahead with the installation of an RF gain control. We also see his use of a steel screw and an outboard coil in series with the PTO coil. All of these mods are fine — I have used all of them. We just advise newcomers to build the basic receiver first, then put in mods from there.
Derek has gone the extra mile (many miles in fact) by building a Double Sideband transmitter to go along with his receiver. We know many will want to do this. Our advise remains: Build the basic receiver first, get it working, then do the mods, perhaps culminating in the build (as Derek did) of a Double Sideband transmitter and the creation of a DC-DSB transceiver.
Here is a video of just the receiver in action.
Note that the DSB transmitter circuitry is on the board:
And here is Derek demonstrating a phone contact with the resulting DC-DSB transceiver:
Derek wrote:
Bill,
Let me introduce myself, I am a recent electrical engineering graduate from Purdue and a long-time listener of the podcast. I want to thank you and Pete for being one of the reasons I chose to pursue my degree in the first place. I’ll admit that in the more difficult stretches of getting my degree, I often pulled out the podcast to be reminded of the fun that can be had with radio and electronics.
Until recently I had to hang my head low along with the majority of the other ‘appliance operators’ out there having never built anything with my two hands that can be used to pull signals out of the ether.
I am no stranger to building projects, PCBs, and melting solder but I usually chose to either stick to the dreaded digital domain or focus on antennas, filters, and other ancillary equipment. The logic being that I like to have a “known good” radio for the shack and that I would focus on other equipment to supplement the radio. I still follow this logic when I want to contest and we all know that antennas are well worth the effort, I’ve just finally had enough of being an appliance operator and have your podcast to thank for the extra push.
I had been following the original effort of the TJ DCRX with interest from the start and earmarked this project as one I would like to build based on its inherent simplicity and good performance. However, the demands of school and a recent (at the time) abortive attempt to build an AM superhet with an SA602 the year prior made me (I got as far as feeling the joy of oscillation but regretfully petered out after that) put this one the backburner for about two years until December 2024.
By coincidence, I independently decided to start this project just before your show with the HRWB folks and the gauntlet being thrown down, which has spurred many to build this receiver. It has been great to see the extra coverage on the receiver, and the commentary has been very insightful for someone trying to build this for the first time and with as many of the “improvements” as possible.
For better or for worse, I’m the type of guy who wants to understand the “why” behind all the design choices and, from there, try to incorporate as many lessons and improvements as possible to make the “best” version possible. I’m not saying I make the best version of anything, but it’s just a quirk of the way I think and justify doing a project. It always has to be “this and some additional improvement;” otherwise, I would decide against doing it.
Rambling aside, I ended up building the DCRX, adding the RF attenuator from N3FJZ’s website, and incorporating the lessons you learned after experimenting with improving the tuning on the PTO. I added an external series inductor wound on a dowel rod and used a zinc-coated steel screw as opposed to brass. I found that this gave solid tuning performance across 40m and was easy enough to tune in CW or SSB signals (after 3D printing a large knob for the PTO bolt). Alan W2AEW’s video on mixers was a great tutorial to use to verify that my mixer was mixing. With the radio assembled I was treated to the joy of hearing my receiver breathe in the sounds of 40m for the first time last weekend and even managed to copy some Croatian DX during last week’s contest. As Farhan said to do, I have spent the last few days enjoying the receiver and figuring out its quirks before moving on to the next step.
The only “issue” I have noticed is that I still get some AM breakthrough despite tuning in the bandpass filter. The problem is very noticeable if I accidentally put my finger on the wires going to the AF gain pot. If I do that the AM station is the only thing I can hear. This makes me think the problem is after the bandpass filter and more investigation is needed. Maybe using coax on the control lines to shield it will help? Regardless I am impressed with how well the receiver sounds, the stability of the oscillator, and the effectiveness of the simple audio amp….
Again thank you and Pete for your work on the podcast and for helping inspire countless homebrew radio operators!
73s,
Derek N9TD
——————–
Thanks Derek. And thanks for helping other hams get the 3D printed PTO coil forms that they needed.
For more information on how you too can build the receiver:
A few of the builders are so new to the hobby that they don’t even have ham licenses yet. That is the case with Chris from Wales.
Chris writes:
Here’s mine up and working, antenna is now 84’ of wire from a window to a tree with 33’ counterpoise hanging to the ground. Just for the record I have absolutely no experience of radio and only one year of messing around with electronics. I’ve learnt more in the last 4 weeks thanks to you guys. It has been a great experience. Thanks
I replied that if there were any justice in the world, Chris would be given a ham license just on the basis of having built this great looking and great sounding receiver. You can hear it handling some 40 meter SSB signals in the clip above.
Thanks a lot Chris!
For more information on how you too can build the receiver:
Scott KQ4AOP’s build of this receiver is especially noteworthy, becasue he used the receiver to hear the very first ham radio signals he ever received. I don’t think any of us can make a similar claim.
Scott wrote: “Those first sounds were my first time ever hearing any Amateur Radio first hand!” You can see Scott’s deep commitment to homebrew: “I want to build my own gear for 40m. I want to learn morse code. I want my first contact to be on my own gear.” Wow Scott, the building of the receiver is the hard part, and you have already done that. I think you are well on your way. In the video above you can watch Scott tune the entire 40 meter band and a bit beyond. You hear CW at the low end. Then FT-8. Then SSB. Up just above the top of the band I think you can hear our old nemesis Radio Marti. And this powerful broadcaster is NOT breaking through on the rest of the band. FB Scott. Congratulations.
Matt was one of the first builders of this receiver (see above). He heroically stuck with the very small speaker that we had used in the high school receiver.
Matt wrote:
I just wanted to publicly thank you for doing this. I’m sure it’s been a lot of work but I’m very grateful for the experience. I’ve always wanted to home brew and I’ve done a few little things such as filters and attenuators but this has really given me the motivation to really dive in deep.
I’m 44 and I’ve only been a ham a few years so hopefully I have lots of time ahead to get others excited about home brewing. We have a very active club here in KY and there are quite a few folks mildly interested in home brewing, I’m going to push some of them to start a builders group in the club with me. This is entirely due to the effort you have put into this project!
Thank you.
Matt also builds balloons with tiny solar-powered ham radio transmitters aboard. These balloons fly around the world. He is advising Vienna Wireless Society on their balloon project. Just last night Matt wrote:
In case anyone is interested, my balloon that has been spending a lot of time in the northern latitudes popped back up again today after being quite for nearly two weeks. Looking at the path prediction on HYSPLIT it’s going to make another loop to the north but at least the earth is tilting back to give me a more favorable solar angle. It’s only going to get better as spring rolls in.This balloon lost a little altitude shortly after launch for unknown reasons so it’s not quite a high as I would like but as long as it can stay away from spring storms, it should still have quite a bit of life left in it. This one is still flying on my old callsign. I got my vanity callsign when I thought the balloon had gone down, then it showed back up. Whoops, oh well, I tried. Matt NE3U
Peter VK3TPM is a long-time member of the SolderSmoke community. He is a software developer and technology commentator based in Melbourne. But that digital background did not stop him from diving headfirst into this highly analog project. He fought a lot to get the stages of his receiver working properly. The AF amp was full of challenges. He overcame all of them and ended up with a very fine looking and sounding receiver. See above.
Going the extra mile, Peter took his newfound abilities into the world of phone transmitters. He whipped up a 75 meter DSB transmitter and used it to check into two Australian Technical nets:
This is really great. You can see the look of pleasure and pride in Peter’s face as he uses his machine to send his voice far across Australia and into Tasmania. This is the kind of satisfaction that comes from homebrew.
I am encouraging him to combine the his DC receiver with additional stages (perhaps from the DSB transmitter) to make a DC-DSB transciever.
Thanks Peter!
———————————————
For more information on how you too can build the receiver:
Our Direct Conversion Receiver is being built around the world, but one of the most exotic locations for a build is the island of Bali in Indonesia. There Wayan YD9BAX set out to build the receiver.
Early on, Wayan noted that he would have difficulty getting the 1000:8 ohm AF output transformer we were using. This transformer was easy to get if you have easy access to Mouser, but a few prospective builders in Europe and the U.S. expressed deep objections to our use of this device. Some complained that we should have used a push-pull amplifier. Others complained that they didn’t have one of these in their junk box. Some even hinted that we should have gone with an LM386 chip. But we stuck to our plan, noting that the very simple AF amp circuit we had developed would be understandable in ways that the alternatives were not. Still, I worried about Wayan. He might have really been out of Mouser range.
Yesterday the above video appeared. Wayan finished the receiver. It is inhaling nicely on both SSB and CW. The CW signal you hear in the recording is that of YB1IHL. That is CW from Indonesia as picked up by a homebrew recevier. FB!
How Wayan cracked the code on the transformer is inspiring. He essentially homebrewed the part. Wayan wrote on the Discord server:
At last I can hear the CW and SSB coming in. The one and only 9v battery that I have during homebrewing forcing to switch to bench PSU with 9,3v setup Pardon me for the messy board and layouts, excitement that it works with parts I have in hands is everything. I learn a lot during this project, including inability for sourcing 1k:8 audio transformer causing me to build my own xformer from 600 ohm transformer former and magnet wire from a broken relay, tedious works but I learn new things. Need to tidy up and may need to build another mixer and BPF again.
He also homebrewed the PTO coil former.
Wow, that is all really inspiring, and is a great example of the homebrew spirit at work.
Aaron ZL1AUN used his homebrew SolderSmoke Direct Conversion receiver in a 40 meter SSB contact with his fellow New Zealand radio amateurs. His transmitter was a modern commercial rig, but his receiver was the Direct Conversion receiver.
I think Aaron’s video is an excellent demonstration of how stable and useful this receiver really is.
The next step for many will be the construction alongside the DC receiver of a Double Sideband transmitter. You could make it with only the receiver PTO serving as the common stage. Just build another mixer, a mic amp, and an RF amp with low pass filter. Switch the DC voltage and the antenna from T to R and you will be on the air, on phone, fully homebrew.
Here is an article describing how I did this on 17 meters in the Azores in 2001:
Lot of success! So far 22 completed receivers: 35 others are being built.200 or so people are on the Discord server.
What a great achievement this is! Folks are homebrewing receivers.
Scott KQ4AOP heard his very first amateur radio signals through this receiver. FB!
Lots of great ham homebrew spirit. NE3U, N9TD and others 3d printing coil forms for others. FB
It is not too late. Dean’s videos and the Discord server will remain up, even when we ourselves have moved on.
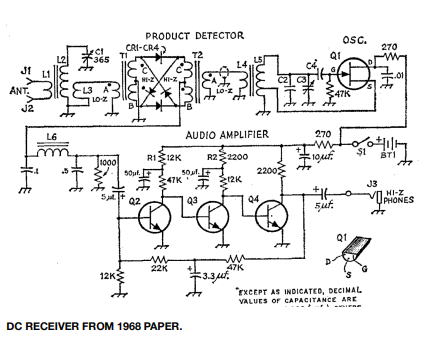
Big Picture: Farhan’s Four Stages — All you need to build a rig: Oscillator, Filter, Mixer, Amplifier.
Homebrew and Manhattan vs. Kit built with PC board. We think Homebrew is a better experience. Dean recently assembled some Ikea kit furniture. Does that make him a carpenter? No.
We do update the schematic as we learn. This is similar to what happens to software. Github? Version 2.3? In the old days, when QST came once a month, we lived a harder life. We don’t have to do that anymore.
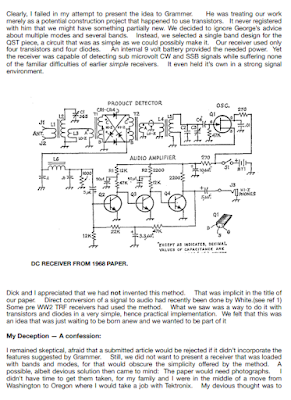
Let’s talk about the boards one by one:
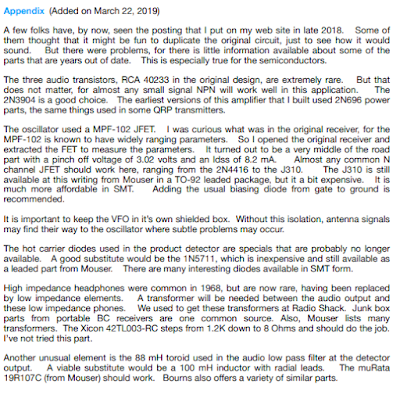
The Oscillator (VFO or PTO):
— Started out as an amalgam of Farhan circuits: We liked the very simple oscillator he used in his Hyderabad DC receiver project for the girls schools. No need for a hard-to-find variable cap. But we found we needed a 3.3 k ohm resistor in the emitter to make it go. We took the buffer/amp from Farhan’s “Daylight Again” circuit, but later (much later!) added a .1uF cap across the source of the J-310.
— With brass screw, not really a permeability tuned oscillator. Brass has same permeability as air. Works via Eddy currents. But the screw thing is very reminiscent of the old Collins PTOs, so we call it a PTO. And it IS s PTO if you used a steel screw. You should study the doc in the mods section about how to modify the PTO. Metalurgy matters!
— We used silver mica caps in the frequency determining circuits. This is important.
The Mixer:
— We started with a simple two diode, single transformer singly balanced mixer. Only LO signal would be balanced out. This would work, but we got a lot of AM breakthrough from Radio Marti, just above the 40 meter band. So we went with a homebrew diode ring mixer.
— Important to unserstand how the diode ring really works: LO just switches on and off the diodes. Very cool that several builders sought to understand how diode ring works.
— Best way to test the PTO and the Mixer? Put them together and look at the waveform at the mixer input. Is it flat topping? Then both stages are working.
— Diplexer: From QRP legend W7EL’s Optimized QRP transceiver. Seemed to help knock down Radio Marti. But we kind of knowingly disregarded AF amp input impedance. It would have been too complex to fix. We were going for simplicity.
BP Filter:
— We actually got to do the NanoVNA test with one set of the high school students. This was very cool. Proves the worth of the NanoVNA.
— Again good to learn the theory.
AF Amp:
— Kind of an amalgam of a Forest Mims amp and the amp from the Herring Aid 5.
— Sure, an LM386 would have been simpler. But we did not want to use ICs. And IC AF amps oscillate too. You learn more by going discrete.
— We used a transformer. For simplicity. We know the push-pull circuit, but wanted to avoid it. Some guys are going to other AF amp circuits becasue of the transformer. See this as an interim measure… You can fully meet the challenge later, when you get the transformer.
— We also — in the name of simplicity — did not use feedback amps. We have an optional bandaid resistor across the oscillator to lower overall gain.
— It can oscillate. But keeping leads short, keeping inputs away from outputs, putting adequate electolytics on the 12V power rail can prevent this. This is a good lesson in good construction practices. And with the real world of amplifiers (they all aspire to be oscillators!)
——————-
Some Tales of Woe:
Simple mis-wiring – need to learn to read schematics
Transistors in backwards – importance of checking the data sheet for your brand – sometimes different brands of same part have different pinouts
Lying Test Equipment
Jay W3V3 unreliable measurements from old Fluke auto-ranging multimemter
Phil, W1PJE – using a 10X probe with scope termination set to 50 ohms
Peter, VK3TPM – faulty component tester (mixed up collector and emitter on NPN transistor)
And many, many setup issues with scopes, signal generators, TinySAs, NanoVNAs
Bad parts
Some “lessons learned” taken from the Walk of Fame Channel
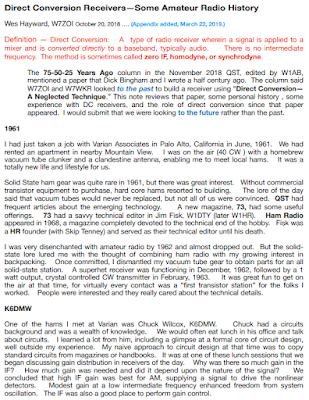
Wayde, VA3NCA – taking care when choosing junque drawer components, solidifying concepts introduce in the licensing material – benefit of hand-son experience “building them made them more real”
Peter VK3TPM – don’t trust your transistor tester, transistors can pass signals even when wired backwards. Importance of 10X probles. NP0/C0G caps for frequency stability
Ken, W4KAC – learned to better use his test equipment to trouble-shoot, and finally learning to trust his troubleshooting after changing out a faulty transistor.
Parts sourcing: We were surprised at how much time people spent on this. Parts sourcing struggle reminds us of the importance of 1) understanding the circuit and 2) having a decent junkbox. 3) scrounging old parts when necessary.
Looking ahead: Antennas are important! You probably can use Cat 5 cable instead of real coax. Noise is natural. Mods are fun. CW in some ways harder than DSB. Lot of antenna info on the internet.
You can modify the PTO for easier tuning. See the doc. Add a front panel, or a case. Once your basic receiver is done, you can experiment with better circuits. See the mods doc for ideas.
Final Comments:
— It is ultimately the builder who has to make the machine work. Homebrew means that YOU the builder are going to make it work.
— Be careful about who you take advice from or give advice to. Don’t be afraid to say “I don’t know.” Ask yourself: Is the guy who is giving me advice really an experienced homebrewer? Am I?
— We learned a lot in this process. You guys have made this a better receiver.
— Be careful about starting over… Bill and Dean’s homebrew nightmare!
Just 30 minutes prior to this, my wife Elisa happened to see on Instagram a map showing the flight path of the Falcon 9. We didn’t know that this was coming! I checked and got a live feed from Cape Canaveral of the launch. I figured we might see something if we looked to the north-west. Wow, did we. The Falcon 9 put on an amazing display. On January 25, 2025 we had seen a meteor-bolide fireball on a similar track. That was quite something, but this was really amazing. You can hear our excitement in the audio.
Thr bright object is Venus. The rocket appears to turn off its engines shortly after (from our point of view) it passes Venus.