Chuck Adams’ Modification of the MXM Simple Transceiver — An Early QSO with the MXM Thirty Years Ago

Click for a better view
Esteemed Homebrew Hero Chuck Adams AA7FO saw me struggling with the T/R switch on my hamfest-found MXM SupeRX/TX transceiver. Chuck kindly sent me a modification of the circuit that allowed for automatic T/R. I see it also envisioned the use of a VFO. We are not sure if this version of the MXM transceiver ever made it to market, but it certainly would — in any case — be of interest to homebrewers.

Chuck wrote:

Attached is a schematic I drew for Bruce almost 30 years ago with a program that I wrote. This is for the Simple Transceiver where Bruce and I worked out the solid state switch to replace the slide switches you have to use to switch between receive and transmit.

BTW. MXM stand for 1990, the year Bruce started his kit adventures. I worked Bruce on the first beta build of the transceiver Denton TX to Smithville TX on 40m during the day.

Thanks a lot Chuck.

So Many Wonderful Things on W7ZOI’s Site

There he is. Wes Hayward, W7ZOI in 1957. I had never seen this picture before. I found it on Wes’s recently updated “shackviews” web page: http://w7zoi.net/shackviews.html .

There are so many treasures on that page, and on all the other portions of Wes’s site.

Some highlights for me:

— Wes’s description of the station in the above picture.

— On his page about Doug DeMaw, Wes mentions that after Doug edited Wes’s 1968 article about direct conversion receivers, Doug built some himself, experimenting with different product detector circuits. Having used Doug’s mixer circuit in many of my rigs, and having recently experimented with different product detectors for my HA-600A, I kind of felt like Doug was watching over my shoulder, guiding me along as I experimented.

— Wes’s use of a digital Rigol oscilloscope. Makes me feel better about giving up on my Tek 465.

— The page about Farhan’s visit to Wes, and the awesome gathering of homebrew Titans that ensued…

— Wes’s meeting with Chuck Adams.

Thanks Wes. Happy New Year and best of luck in 2021!

SolderSmoke Podcast #225: Mars, uSDX, G-QRP, HP8640B, DX-390, Rotary Tools, Walla Walla SDR, MAILBAG

SolderSmoke Podcast #225 is available

http://soldersmoke.com/soldersmoke225.mp3

Mars, West Coast smoke.

Pete’s Activities:
— DC receivers.
— CW offset
— GQRP talk
— The uSDX project

Bill’s Bench
— Sliding into the Vintage Test Gear Cult: HP8640B .
— Fixing up and figuring out Radio Shack DX-390 receivers.
— 220 to 110 on a few remaining devices.
— Got myself a Dremel-like rotary device.

Tech News:
— ARRL/TAPR Convention: SDR project from Walla Walla University students. Intuitive explanation for why desired and image freqs in a mixer come out with very useful phase differences.

— Chuck Adams’ Amazing Lab Notebook. Includes a simple circuit to measure resistance and Q in crystals. FB.

MAILBAG:

— Dino KL0S SITSing in his shack, homebrewing 9 MHz filters FB Dino. Airborne!
— Dave NT1U sent us the famous 1968 QST Article by W7ZOI re DC RX.
— Ron K0EIA listening to SWBC staions with uBITX.
— Ted AJ8T Korguntubes making a 12AX7 equivalent.
— Joel N6ALT sent me a nice DX-390 manual. Thanks Joel
— Bob KD8CGH alerted us to the uSDX project — story on the blog.
— Craig AA0ZZ Sent a great message with insights on computer code — I will put up on the blog.
–Tracy KN4FHX reports on optimistic prognosis for SolarCycle 25. Some chickens may have to be sacrificed.
— Stephen M0OMO Thanks SolderSmoke for rekindling interest in this hobby.
— Paul VK3HN has a cool new rig — The Prowler — check it out
— Steve N8NM working on his Sunbeam car — Pete already knew about the carburetor synch problem. N6QW knows everything.


Putting Junk Mail to Excellent Use: Tony G4WIF’s Proto-boards


Tony’s Version of Audio Section of N6QW’s LBS Receiver

Tony Fishpool, G4WIF writes:

I’ve been intrigued by Pete’s matrix pad method. Of course, few of us have the machinery to mill them as Pete does, but etching is a possibility. Now some of Pete’s boards clearly have a lot of noodling behind them. His boards are quite big with little areas of pads and space between. The layout for the whole project has clearly been considered in advance.
I wanted a board that I could make modular, take little time to etch and adapt for the circumstances. These “proto-boards” are the result.

The project is Farhan’s “sweeperino” and one board is for the Si570, and the other the AD8307.
The Si570 board is now complete and working:


The PCB method is pure Chuck Adams. His videos on YouTube describe the toner transfer method better than I could.

The only difference for me is that my glossy paper comes free from travel agent brochures.
Just express a passing interest in Viking River Cruises and you will never pay for PCB paper ever again!
There is a free printing only version of the software I use, so if SolderSmoke listeners want to use the proto-board design, I will happily email them the files.


Kind regards
Tony G4WIF

The 1Watter

There are currently only 2 in the universe. And they have been talking to each other. Soon there will be more. Many more.

http://www.kitsandparts.com/1watter.php

http://www.1watters.com/

http://www.k7qo.net/onewatter.html

Chuck Adams explains (via the qrp-tech mailing list):

Our book: “SolderSmoke — Global Adventures in Wireless Electronics” http://soldersmoke.com/book.htm Our coffee mugs, T-Shirts, bumper stickers: http://www.cafepress.com/SolderSmoke Our Book Store: http://astore.amazon.com/contracross-20

SolderSmoke 175 Mellow Audio, Pete in China, JBOM&BITX, ArduinoWoe, BFOVFO Chip, Chuck Adams, Mailbag

SolderSmoke Podcast #175 is available:

http://soldersmoke.com/soldersmoke175.mp3

18 April 2015

— Some enhanced audio testing (Mellow, with Presence!)
— Pete’s trip to Fake-shu-out, China
— My visit to the National Academy of Sciences
–Bench Reports:
Pete’s JBOM Re-born
Bill’s plans for a new SSB Transceiver
— Arduino Woes BASTA!!!!!!!!!!!
— Si5351 VFO/BFO development
— Chuck Adams, Tribal Knowledge, and Muppet boards
— KX3 QRO?
— What antenna for Pete?
MAILBAG

Our book: “SolderSmoke — Global Adventures in Wireless Electronics” http://soldersmoke.com/book.htm Our coffee mugs, T-Shirts, bumper stickers: http://www.cafepress.com/SolderSmoke Our Book Store: http://astore.amazon.com/contracross-20

Chuck Adams’ Secret Recipe for Muppet PC Boards (and lots of other homebrew tips)

A few days ago I shared an e-mail from John N8RVE on his re-build of the SW-40. John used a “Muppet” board, Muppet being a combination of Manhattan and Ugly techniques. But there is nothing ugly about it really. I joked in the title of the blog post that the beauty of this technique is almost enough to get a homebrewer to abandon the Manhattan technique. Now, I was born on Manhattan island, and I went to Manhattan College, and I have been using the Manhattan technique for many years, so there is a lot of homebrew inertia at work here. But that SW-40 looked good. John mentioned that Chuck Adams K7QO has a series of YouTube videos on how to make Muppet boards. This morning as I waited for the bands to open up, I decided to take a look.

Wow, they are really great. I couldn’t stop watching them. I kind of “binge watched” the whole series. Chuck Adams is a really great teacher. There are lots of great homebrew tips in those videos, and not just about the boards. I NEED one of those new G3UUR crystal testers, the version that also gives you ESR! I WANT a laminator, an infrared thermometer, some Krylon clear, and pool chemicals! And a harmonica reed tuner!

I’ve been sort of planning my next rig. It will be a version of the BITX. But having recently built two BITXs using the Manhattan technique, I kind of feel the need to do something different. I am planning to use some different circuitry (termination insensitive amplifiers) and MAYBE an Si5351. Perhaps plug-in filters. But now I want to also move forward in terms of building technique. I want to Muppet!

Thanks Chuck!

Here is the link to part one of Chuck’s excellent video series:
https://www.youtube.com/watch?v=O6AmT1trO60

Our book: “SolderSmoke — Global Adventures in Wireless Electronics” http://soldersmoke.com/book.htm Our coffee mugs, T-Shirts, bumper stickers: http://www.cafepress.com/SolderSmoke Our Book Store: http://astore.amazon.com/contracross-20

Almost Enough to Make You Abandon Manhattan: John’s SW-40

Hi Bill,

You said you didn’t mind if I sent you some of my finished projects so here is the latest. I scratch built the SW 40 that I had previously built from a kit by K1SWL. I always liked that radio, and thought by laying it out I would learn more about it. In testing it out after I aligned everything I made a qso with Mike (K3WAS),and got a good report, and I didn’t let out any of the magic smoke or sacrifice any chickens. You gotta love this hobby.
The rig tunes from 7.034 to 7.063, and I had about 2.3 watts out, but ran into some slight problems with instability at the end of the qso with Mike. The PA was getting a little hot, but with the excitement of having it work right out of the gate it really didn’t matter at the time. The board layout was done with express PCB, and using the toner method, placed it on the board. Chuck (K7QO), has some great youtube videos showing the process. I have to admit I got more knowledge by laying out the board as opposed to manhatten construction, and came away with a better understanding of the radio itself.
Now to build the case. the board is 5.25 by 7.25 inches, and I may have to sneak one of my wife’s alum cookie sheets to fabricate the case. She doesn’t bake till Christmas so it will be a calm summer. I also made provisions on the board for a digital readout, but for now I just want to enjoy the rig as it is.
Thanks to both you and Pete for taking an interest, as well as the great job on soldersmoke.
73
N8RVE John

Our book: “SolderSmoke — Global Adventures in Wireless Electronics” http://soldersmoke.com/book.htm Our coffee mugs, T-Shirts, bumper stickers: http://www.cafepress.com/SolderSmoke Our Book Store: http://astore.amazon.com/contracross-20

Chuck Adams’ MUPPET Construction: Manhattan-Ugly-Professional Placement Experimental Technique

From a message from Chuck Adams, K7QO, to the QRP-Tech list:

OK, the rush is on. I figured out what I want to do and now
the race is on to use up over 1,000,000 parts before the
estate sale. :0)

And you know I have to show this to every one, whether any
one uses it or not is up to them. I fell into the following MUPPET
technique through trial and error.

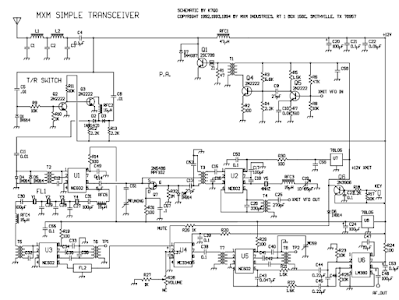
Manhattan Construction: Jim, K8IQY, 1998 winning of Dayton contest
started it.
<http://www.k8iqy.com>
<http://wdv.com/Electronics/Fab/ManhattanConstructionTechniques.pdf>

and then there is the variation on this using the ‘Island cutter’ or
a special
diamond circular shaped drill for making pads. Generates hazard
dust and
I have yet to see some one that can make the same pad every time. I
don’t know of a tutorial online that shows using a drill stop to get
uniformity. IMHO.

Ugly Construction:
<http://www.qrp.pops.net/ugly.asp>
<http://www.arrl.org/files/file/Product%20Notes/chapter_1.pdf>
<http://www.sm0vpo.com/blocks/deadbug_0.htm>
<http://www.alg.myzen.co.uk/radio/qrp/ucw.htm>
and about 16,000,000 other sites with a Google search engine.

Professional Construction:
<http://www.youtube.com/watch?v=xm9vW2I-41g>

And using all of the above I’ll call the ‘MUPPET Construction’ for
Manhattan-Ugly-Professional Placement Experimental Technique
for construction of electronic circuits.

Now, unless you have been hiding in a cave for about 20 years,
all of the above should be familiar to you, except MUPPET. For
lack of a better name, it is the term I will use for collecting all
the techniques together to build something.

OK. Going to the known techniques. What is it that you like and
don’t like? How about expense to get started, other than the parts?

Ugly. Requires a supply of high valued >1Mohm resistors for standoffs.
But is is quick and easy. Some times difficult to debug for some else
that did not build the circuit. What is this gismo here for? …

Manhattan. Nasty super glue and doing the layout. Harbor Freight or
similar punch, some people have difficulty finding. Takes time to place
the pads and let them set.

PCB. Layout time. AND, something no one bothered to mention.
Drilling a lot of holes and getting them all centered is a royal pain.

——————————————–

You still are going to be out some expense for equipment. For MUPPET
you will need a PCB shear/cutter and some cheap items for doing
PCB etching. Don’t give me grief about the muriatic acid. Just
kill it with backing soda when you are done and flush.

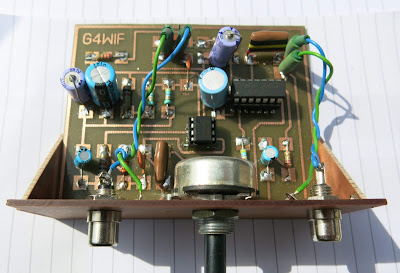
Here is an example out of the gate. Just a simple VXO test fixture
to determine why I could not get constant startup on a VXO in a project.

<http://www.k7qo.net/p4110006.jpg>

Then I got excited about not having to drill holes, I can do Manhattan
layouts and as you will see I magically came across a tool that costs
very little and makes things entirely repeatable as many times as you
want.

For the Manhattan projects and my stuff spread around the Internet
like bread crumbs in a fairy tale, I constantly get emails about how
I laid the project out and what software did I use and how I wrote it.
This new technique uses expressPCB for the layout. I just the layout
on the top layer. ExpressPCB, for economical reasons, does not
print out the top layer so that you can easily use the toner transfer
method to make a PCB.

Here is how I get around that limitation. I generate the PCB and
then ‘print’ it out, but not to my Samsung laser printer. I print it to
a ‘PDF’ printer, i.e. the image is sent to a file and converted in the
process to PDF format. I can now manipulate that to ‘reflect it’
about the vertical to get a reverse image, like you do for iron on
shirts, in PDF format and then print that. So now I can do double
sided boards if I ever want to. The reversal is done using a package
called PDFjam for linux and is most likely available for windows.

OK. Here is the most valuable tool for PCB layouts.

<http://www.k7qo.net/p4120009.jpg>

Using the vector board I get exact distances desired between
component legs and when I bend them they will sit FLAT on the
surface of the PCB. And before removing the component from
the board, I cut the leads sticking through the other side to get
the exact same length every time. As it turns out, it is about
0.1″, the same and the standard IC pin spacing and the same
snap points in ExpressPCB. I use 0.1″ SMT pad sizes for the
solder points and 0.2″ spacing in most cases so that I get
the neatest placement possible.

I can use the vector board edge to bend resistors to get
vertical placement on PCBs in kits and here. Each one
will look almost exactly the same. Try it. You’ll like it.

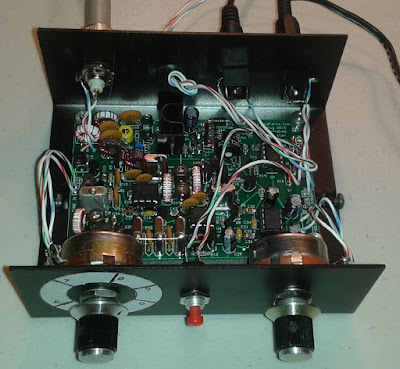
OK, here is a XTAL OSC that I built up in less than an hour,
from start to finish. Yes, you can do it quicker. But I wanted
to able to reproduce the circuits numerous times, if needed,
and now I can easily share them without having to go through
hoops to get the same layout to you or any one else.

<http://www.k7qo.net/p4120007.jpg> Board before populating.
<http://www.k7qo.net/p4120008.jpg> See how neat the transistor sits?
<http://www.k7qo.net/p4120013.jpg> XTAL OSC complete.
<http://www.k7qo.net/p4120014.jpg> Running 11.040MHz crystal.

Side effects. You can do, on the PCB plane on the sides:
Ugly mods and add ons or replacements for larger projects.
Manhattan pad placement for mods, add-ons, etc.

Note. With judicious placement of text, you can document
parts placement for help in building and later showing
someone where you put things and why. Also will help
in debugging something years later.

And just as an experiment. I promise not to cheat.
I will, at 2200UTC, right after posting this email, I will go back
to the lab. I will not eat, nor will I rest until I have done the following
two projects from scratch.
1. Project 001. The HP 8640jr project.
2. Project 004. The G3UUR xtal osc and parameter fixture from QQ.

I want to do this and then show-and-tell the items at tomorrows
flea market/hamfest at DeVry Institute here in PHX AZ and the
AZ QRP luncheon just down the street at the burger place.

FYI and enjoy,

chuck, k7qo (the lab rat #2, since #1 is already taken in NH) 🙂

Our book: “SolderSmoke — Global Adventures in Wireless Electronics” http://soldersmoke.com/book.htm Our coffee mugs, T-Shirts, bumper stickers: http://www.cafepress.com/SolderSmoke Our Book Store: http://astore.amazon.com/contracross-20